CHECK OUT OUR NEW TUTORIAL HERE, IT SUPPORTS MULTIPLE LIGHT SHOWS ON ONE USB DRIVE!
So you saw all the cool videos of amazing light shows and want to give it a try? We will guide you through all steps you need. It’s an easy process and everything you need is a USB stick or hard drive. Oh and a Tesla – obviously 😉 Light shows are currently supported on Tesla Model S, 3, X and Y. Model S and Model X are supporting them if build in or after 2021.
The installed software version must be equal or greater than v11.0 (2021.44.25) which was released in December 2021.
Update: Tesla Light Shows are also working on all new Tesla Model 3 highlands.
Don’t want to follow a tutorial? Buy your plug and play ready USB sticks with the custom Tesla light show of your choice here:
1. Find a Tesla light show and download it
One of the easiest way to find a cool light show which is available for download is to go through our curated YouTube playlist: https://youtube.com/playlist?list=PLojigAwVQ8GRjb9wdGMbL7NLSBdgkkusL
You can easily check out how cool (or not so cool) the light show would look like. If you have chosen your favorite light show head to the first link in the video description to find a download link. Please keep in mind that you can only have one light show per USB stick – so if you want to play multiple shows after each other you either have to put them on separate sticks or change the files after you played one. If you need some USB sticks you can buy them for cheap on amazon.
UPDATE: With the Tesla Holiday Update 2023 it is possible to store multiple light shows on one USB drive. Check out our new tutorial here!
Besides our official YouTube playlist you can also check out these site:
If you don’t find a show you like, contact us for buying a custom Tesla light show fitting to your needs.
After downloading a Tesla light show you should have at least two files on your computer, a .fseq and a .wav/.mp3 file. You then can proceed with the next step:
2. Format your USB stick or hard drive
Before you put the downloaded Tesla light show on the USB stick you need to format it. The stick must be formatted as exFAT, FAT 32 (for Windows), MS-DOS FAT (for Mac), ext3, or ext4. NTFS is currently not supported. We have created a short tutorial on how to set up your stick and how to format it. The video also includes step number 3 (the folder structure for the USB stick)
3. Set up the correct folders on the USB stick
After you have formatted the USB stick you have to follow these rules to ensure that the custom Tesla light show will function correctly when you plug it in your Tesla.
The USB stick:
- Must contain a base-level folder called “LightShow” (without quotation marks and case sensitive).
- Must not contain a base-level TeslaCam folder.
- Must not contain any map update or firmware update files.
4. Move the files to the USB stick
After setting everything up you are now ready to move the light show files you have previously downloaded to LightShow folder. The folder must contain two files (without quotation marks and case sensitive):
- “lightshow.fseq”
- “lightshow.mp3” or “lightshow.wav” (wav is recommended)
5. Run the custom light show on your Tesla
Yea, you made it! You can now get out to your Tesla, insert the flash drive into one of the front USB or USB-C ports, or the glovebox USB port, then wait a few seconds. Please note that the USB ports in the center console may not be working for newer vehicles. In that case use the port in the glovebox.
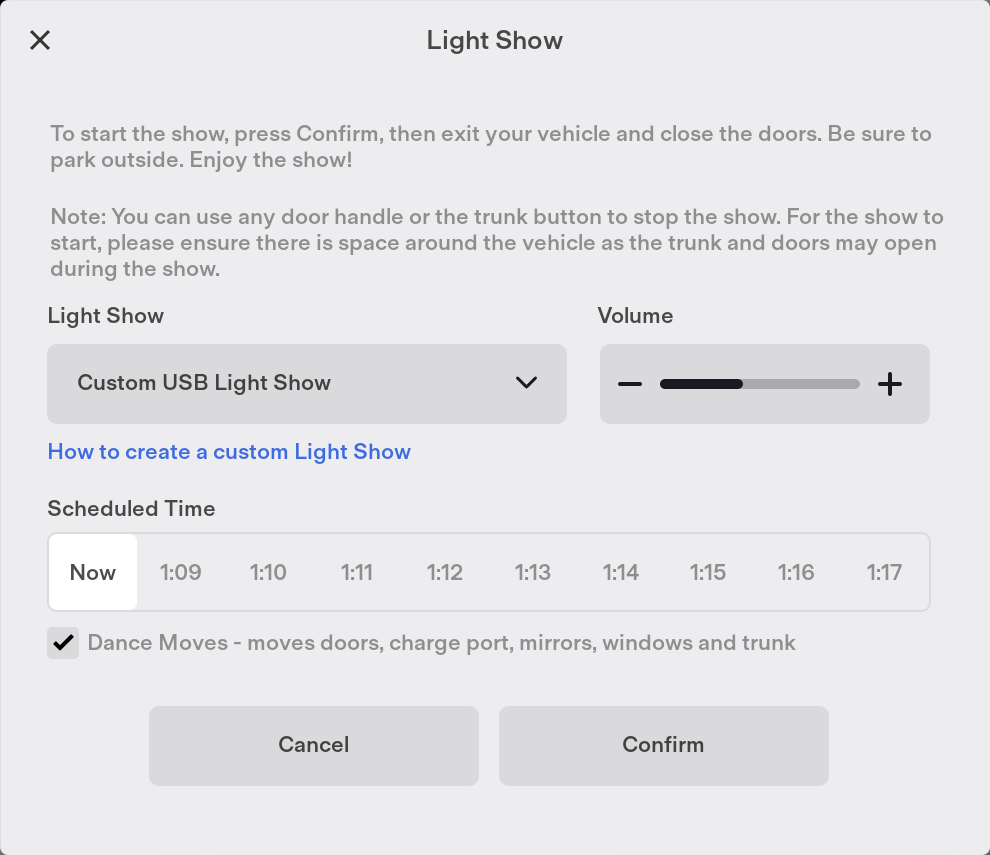
Open the toybox, select “Light Show” and tap “Schedule Show”. Next select “Custom USB Light Show” in the dropdown menu. To start the show, click “Confirm”.
Software version < 2022.44.25: Open the toybox and tap “Start The Show.”. It should load up with no errors and the headline must be “custom light show” instead of “light show”.
After loading is done, step out of your Tesla and close all doors – and enjoy the show!
To much work or technical problems? Buy your plug and play ready USB sticks with the custom Tesla light show of your choice here:
6. Still having issues?
If you have plugged in the USB drive in your Tesla and it does not start playing your favorite light show, we got you.
In our troubleshooting guide we dive deep into common errors that may arise during the setup process and provide step-by-step solutions to overcome them. From file formatting errors to USB drive compatibility, we’ve got you covered. So, if you’re facing any challenges with your light shows, make sure to check out our troubleshooting guide here. We’re here to help you get your Tesla light shows up and running flawlessly!
[…] Tesla’s light show feature allows owners to personalize their vehicles with custom light displays and synchronized music. However, occasionally users may encounter errors preventing the light show from playing or the car from recognizing it. One common error is the “File Formatting Error.” In this tutorial we will explore the causes of this error and provide step-by-step solutions to help you overcome it. If you are looking for a full step-by-step tutorial on how to set up a light show USB drive we got you: How to download, install and start a custom light show on your Tesla […]
[…] The installed software version must be equal or greater than v11.0 (2021.44.25) which was released in December 2021.For Tesla with software version before 2023.44.25 which was released in December 2023 click here and check out our previous tutorial. […]